Introduction
Introduction to the RocketRML Mapping Editor.
The RocketRML Mapping Editor (RME) was designed and built to create descriptive mappings without the need to write or even know any mapping language.
The tool allows users to define a mapping from data structure A (source) to data structure B (destination) using a graphical user interface. To define and use the original data structure (source), the user can specify or upload a representative data sample. To define the target format, the user can specify a Domain Specification by its URL.
The mapping process is approached vice versa, meaning that the mapping definition happens from the destination format to the source. First, the user clicks a property from the Domain Specifications’s (data destination format) tree structure. This opens a dialogue that lets the user select the target property from the date source she wants to map.
1.1 Start tool and sample upload
To start the mapping tool, there are two options:
- Input the Domain Specification URL
This option is meant for new mappings that start from scratch - Input the Mapping File
This option is meant for already existing mappings that have been exported and should be edited
Both options require the definition of a source data sample to begin with or continue the mapping. To upload the data sample click on Insert Data to open a dialog where the data can be pasted into. Confirm the dialog by clicking Save.
All other steps and instructions are independent of the method used to start the tool.
1.2 Tool overview
This subsection describes the main parts and buttons of the tool, depicted in Figure 1.
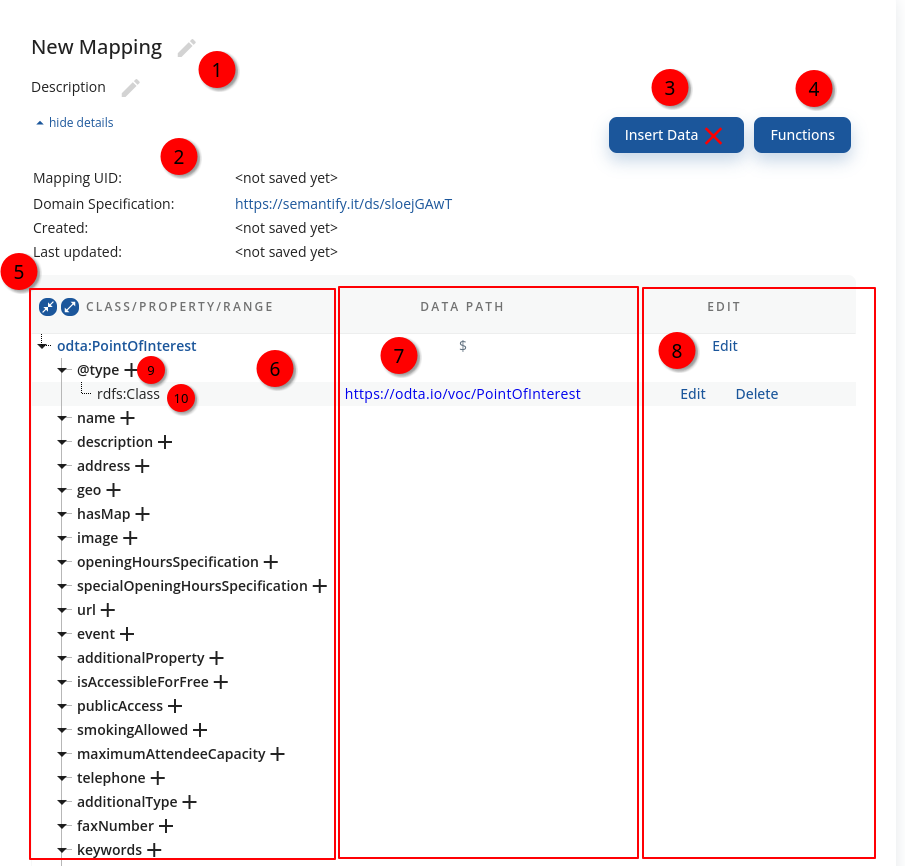
Figure 1: Mapping tool overview.
- Title & Description: Give your mapping a title and a description.
- Details Box: shows details about a mapping.
- Insert Data Button: opens a modal to insert a data sample
- Functions Button: opens a modal to define functions
- Mapping Pane: the main mapping area
- Domain Specification or Target Column: shows the properties and ranges, defined by the target Domain Specification
- Data Path or Mapping Column: shows the mapping path in the source data
- Controls column: allows to edit or delete a mapping in a given line
- Property Label and Range Selection Button: the property that should be mapped with ➕ button to add a new mapping
- Range Mapping Definition: the range of the property that is the subject of the mapping
1.3 Iterator & Subject definition
The Iterator defines the container node in your data sample that holds the set of the actual instances. For example, a structure called "data":[...] or <elements>...</elements>. The Subject defines the root node of your data instance in the knowledge graph. Every other property is, directly or indirectly, connected to the subject.
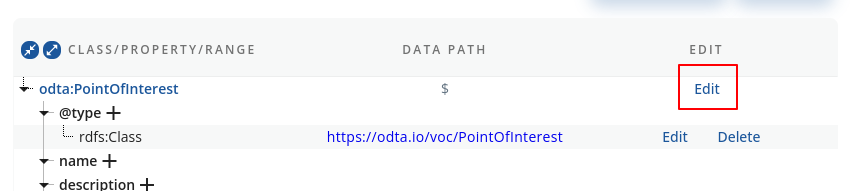
Figure 2: Edit Botton to define Iterator and Subject.
Define Iterator and Subject by clicking the Edit button in the first line, of the Mapping Pane (see Figure 2). The modal that opens gives you two input fields with buttons next to them (see Figure 3). Both buttons open the data sample in a tree shape and let you click the nodes of the tree.
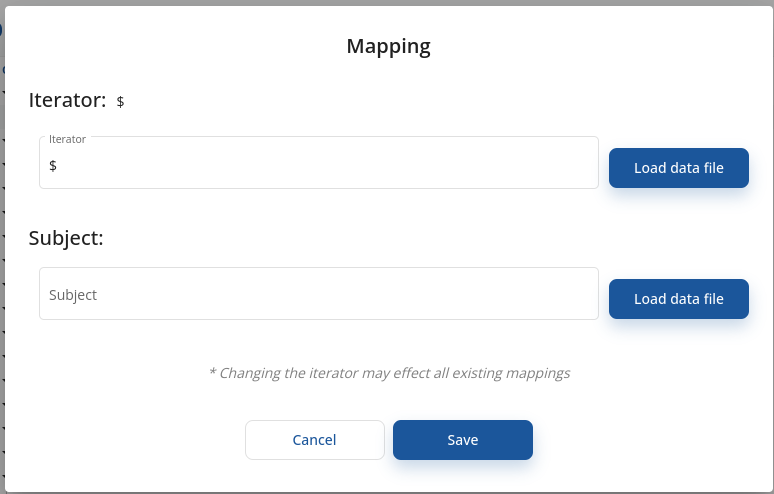
Figure 3: Iterator & Subject definition.
Finish the step by clicking Save.
1.4 Mapping
For the mapping process, select a property you want to map by clicking its ➕ button in the tree. If the Domain Specification defines more than one range for the given property, a property selection modal opens. Select the property you want to map. If the range is a nested Object, like schema:CreativeWork, the object is shown in your Mapping Pane (see Figure 5).
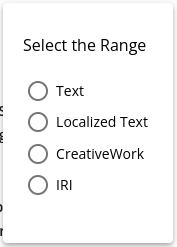
Figure 4: Property range selection.
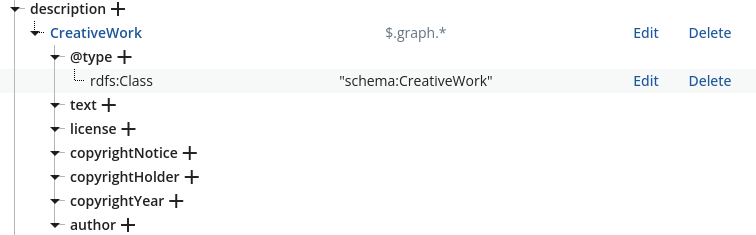
Figure 5: The nested Range schema:CreativeWork.
If the range is a primitive type, like schema:Text, then only one new line is shown and the mapping can be defined by clicking Edit, clicking the Load data file button and selecting an example of the wanted property in the source data.
1.5 View & Export the mapping
When you are done mapping, scroll to the bottom of the page and click the View Mapping button to Copy or Download your mapping for further use (see Figure 5).
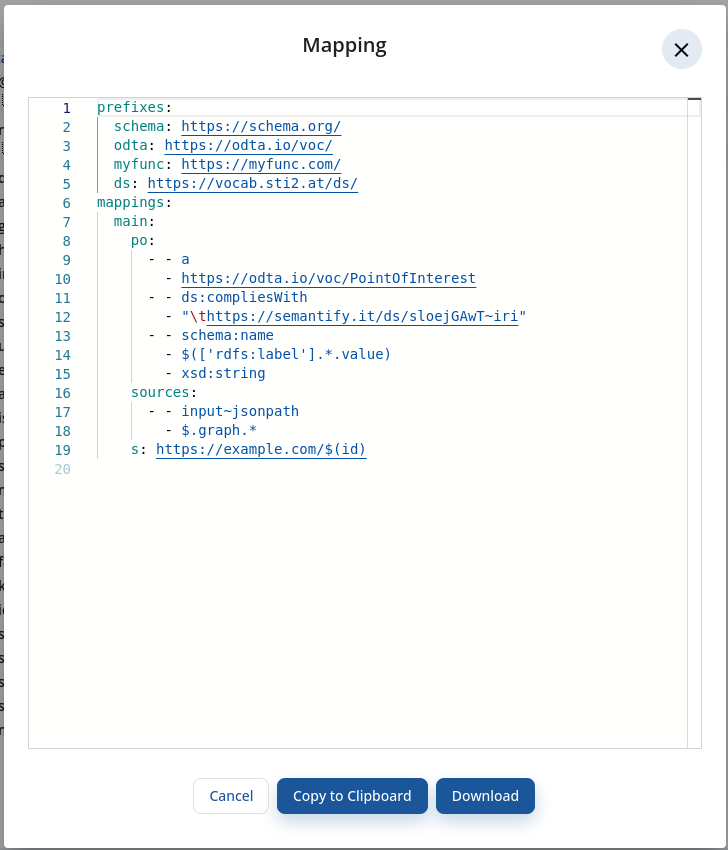
Figure 5: The Mapping View.
1.6 Function definition and usage
A mapping can either map a literal to a property as is, or manipulate the input with the help of a function. The mapping tool comes with a library of pre-defined functions and allows the definition of custom functions.
1.6.1 Using a functions
Start mapping a property as described in Section 4. Then flip Function the switch (Figure 6, Point 1) to change the input to a function selection. Select the function you want to use (Figure 6, Point 2) and load the parameter (or maybe even parameters) from your sample data (Figure 6, Point 3). Finish by clicking Save.
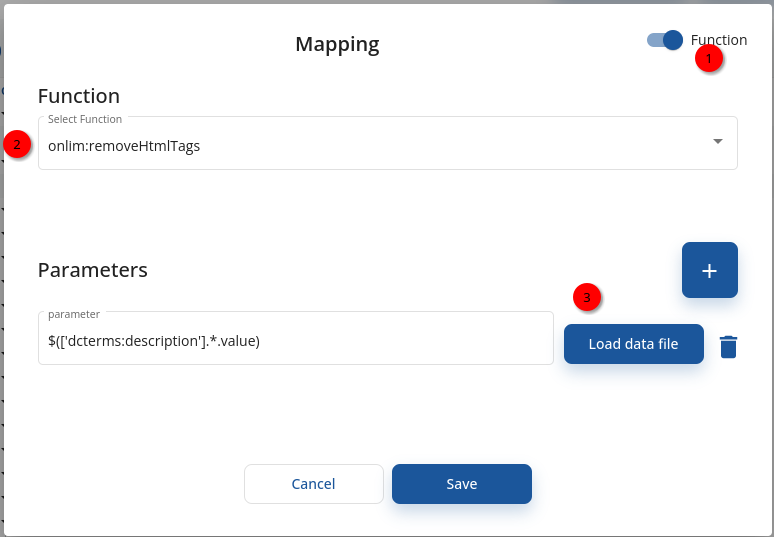
Figure 6: Function mapping UI.
1.6.2 Defining and Using Custom Functions
Custom functions can be defined by using the JavaScript programming language.
Updated over 1 year ago